How to Store Furniture Safely During Home Renovation:
How to Store Furniture Safely During Home Renovation:
A Complete GuideHome renovation projects are exciting. Whether you are remodeling a kitchen, upgrading your flooring, or giving your entire house a structural facelift, the end result is almost always worth the effort.
However, the renovation process itself is notoriously messy. Fine drywall dust gets everywhere, paint drips on unexpected surfaces, and heavy construction equipment creates constant risks of dents and scratches.
Your furniture is one of your biggest home investments. Leaving sofas, wooden dining tables, or electronics unprotected during construction can lead to permanent damage.
In this guide, we will walk you through the best strategies to pack, protect, and store your furniture safely while your home is under transformation.
Step 1: Decide Between On-Site vs. Off-Site Storage
Before wrapping a single chair, you need to decide where your furniture will live during the renovation.
┌─────────────────────────────────────────┐ │ Where Should Your Furniture Go? │ └────────────────────┬────────────────────┘ │ ┌──────────────────┴──────────────────┐ ▼ ▼ 【 Minor / Single-Room 】 【 Major / Multi-Room 】 • On-Site Room Clearance • Off-Site Self-Storage • Dust Seals & Drop Cloths • Doorstep Storage Units
Option A: On-Site Storage (Best for Minor or Single-Room Upgrades)
If you are renovating only one room (like a bathroom or kitchen), you might be able to move furniture into an unused bedroom, garage, or living room corner.
Pros: Zero transport costs, easy access.
Cons: Takes up living space, risk of fine dust settling through internal doors.
Option B: Off-Site Self-Storage (Best for Major Renovations & Flooring Work)
If you are replacing floors, painting the entire house, or doing structural tearing, keeping furniture on-site is risky and hinders contractor workflow. Renting a temporary self-storage unit gets items completely out of harm's way.
Pros: Total protection from dust, paint, and construction tools; frees up working room for contractors.
Cons: Monthly rental fee and transport requirements.
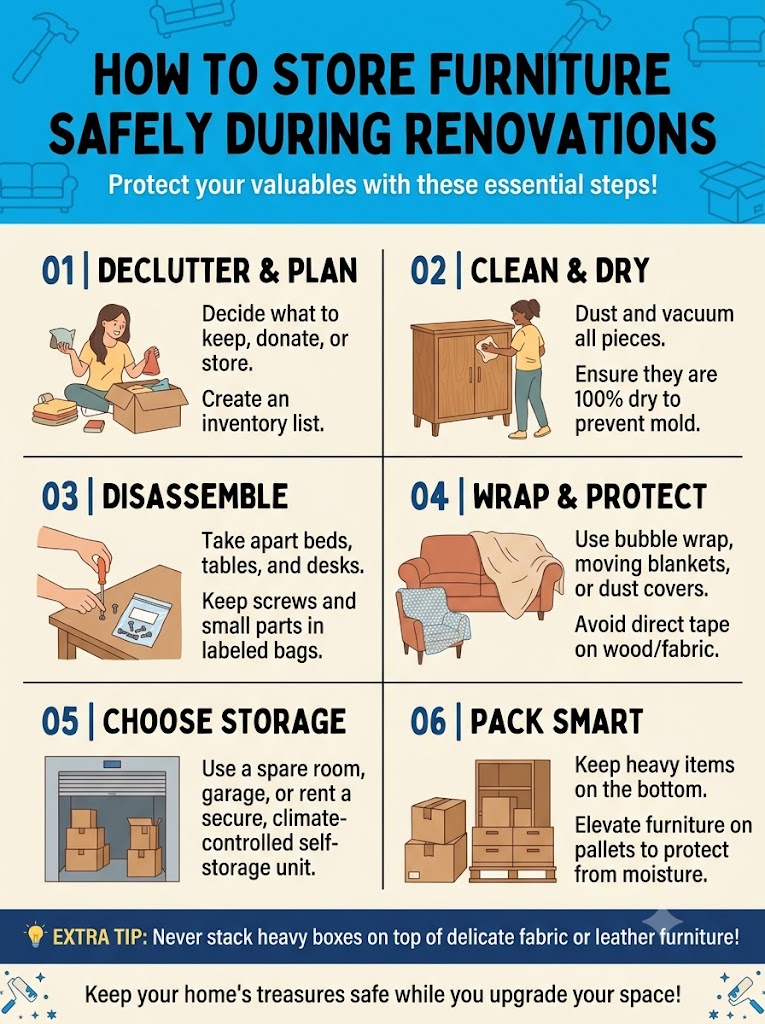
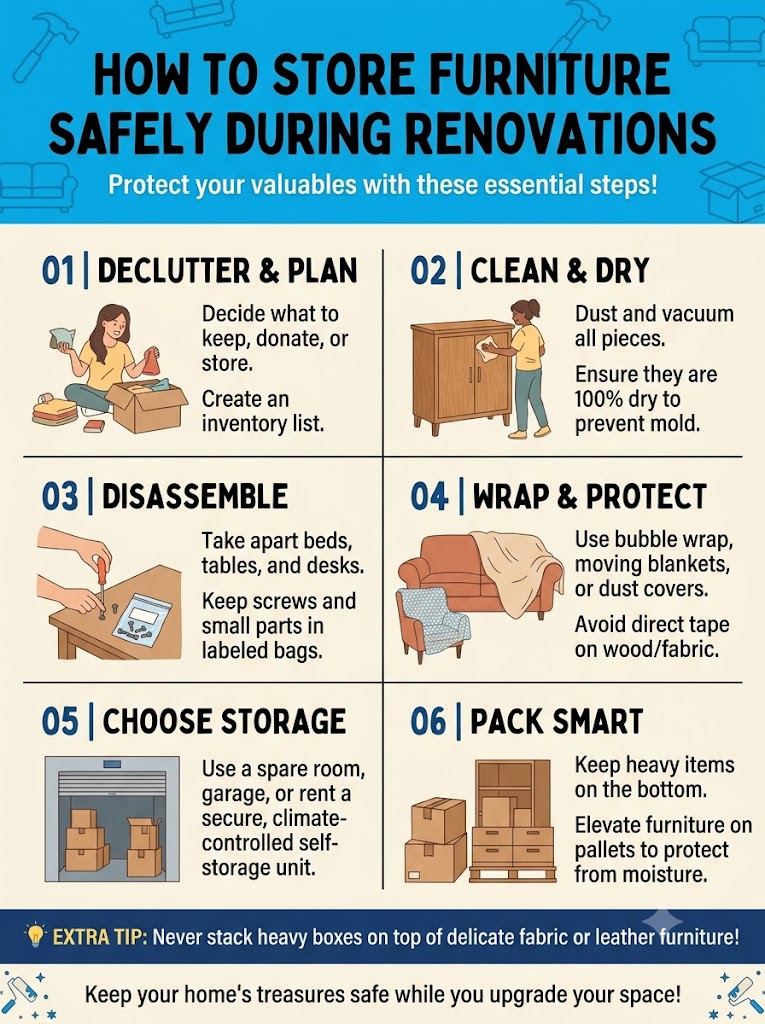
Step 2: Clean and Prepare Furniture Before Storing
Never store dirty or dusty furniture. Trapped dirt can grind into surfaces during moving, and organic food particles on sofas can attract pests or mold.
Deep Clean Fabrics: Vacuum upholstered sofas, armchairs, and mattresses thoroughly. Apply a fabric cleaner if necessary and ensure everything is 100% dry before wrapping.
Polish Wooden Pieces: Clean wooden tables and cabinets with appropriate wood polish. This creates a protective moisture barrier against humidity changes.
Empty All Drawers: Remove books, clothes, and heavy items from dressers and desks. Leaving drawers full makes furniture overly heavy, increasing the risk of frame damage when lifted.
Step 3: Disassemble Bulky Furniture
Disassembling large items protects structural joints from snapping during moves and saves precious square footage in storage.
Detach Table Legs: Remove legs from dining and coffee tables. Wrap the legs together and secure hardware (screws, bolts, washers) in labeled plastic ziplock bags taped beneath the main tabletop.
Take Apart Bed Frames: Unbolt headboards, footboards, and side rails.
Remove Glass Panels & Shelves: Take out glass cabinet doors or glass tabletops. Wrap glass separately in heavy-duty bubble wrap and corner guards.
Step 4: Master the Loading and Stacking Layout
Whether storing items in a spare bedroom or a dedicated storage unit, how you arrange items determines their safety.
Elevate Items Off the Ground: Always place wooden pallets, tarps, or cardboard sheets on the floor first. This protects furniture bases against ground moisture, concrete sweat, or unexpected water leaks.
Never Store Mattresses End-Up: Store mattresses flat whenever possible. Storing a mattress on its side for weeks causes internal springs and padding to sag out of shape.
Heavy Items on Bottom, Light on Top: Position heavy wooden dressers or desks on the floor first. You can stack lighter, padded items or light cardboard boxes on top.
Leave Air Vents / Aisle Space: Don't press furniture tightly against damp exterior walls. Leave a 2- to 3-inch gap around walls to promote airflow.
Checklist: Quick Pre-Renovation Storage Steps
[ ] Clean all furniture surfaces thoroughly.
[ ] Ensure upholstery is completely dry to prevent mold growth.
[ ] Disassemble dining tables, bed frames, and desk legs.
[ ] Bag and label all hardware screws and tape them to the parent furniture piece.
[ ] Wrap wooden furniture in padded moving blankets (avoid direct plastic wrap).
[ ] Put mattresses in heavy-duty mattress storage bags.
[ ] Place pallets or plastic tarps on the floor before setting down furniture.
[ ] Keep delicate glass items stored vertically on edge, never laid flat.
MoveABox Team
Expert team at MoveABox dedicated to making your relocation experience smooth and stress-free. We share professional insights, tips, and best practices from years of moving expertise.